Avertissement
NOTICE: THIS DOCUMENTATION SITE HAS BEEN SUPERSEDED.
For the current documentation site goto: http://docs.cloudstack.apache.org
The Nuage VSP Plugin
Introduction
The Nuage VSP Plugin is the Nuage Networks SDN implementation in CloudStack, which integrates with Nuage Networks Virtualized Services Platform (VSP). The plugin can be used by CloudStack to leverage the scalability and rich features of advanced SDN being provided by the Nuage VSP SDN Platform and to implement:
- Isolated Guest Networks
- Virtual Private Clouds (VPC)
- Shared Networks
For more information about Nuage Networks, visit www.nuagenetworks.net.
Supported Features
The following table lists the supported Network services in a CloudStack deployment with NuageVsp being the Connectivity/Virtual Networking provider, with their providers and supported CloudStack versions.
| Network Service | Isolated Networks | VPCs | Shared Networks |
|---|---|---|---|
| Virtual Networking | NuageVsp (>=4.5) | NuageVsp (>=4.5) | NuageVsp (>=4.10) |
| Dhcp | NuageVsp (>=4.5) | NuageVsp (>=4.5) | NuageVsp (>=4.10) |
| SourceNat | NuageVsp (>=4.10) | NuageVsp (>=4.10) | N/A |
| StaticNat | NuageVsp (>=4.5) | NuageVsp (>=4.5) | N/A |
| Firewall | NuageVsp (>=4.5) | N/A | N/A |
| NetworkACL | N/A | NuageVsp (>=4.5) | N/A |
| UserData | VirtualRouter (>=4.5) | VpcVirtualRouter (>=4.5) | VirtualRouter (>=4.10) |
| Dns | VirtualRouter (>=4.10) | VpcVirtualRouter (>=4.10) | N/A |
| Internal Lb | N/A | InternalLbVm (>=4.9) | N/A |
Table: Supported Network Services
Note
The Virtual Networking service was originally called “Connectivity” in CloudStack 4.0
Supported Hypervisors
The following hypervisors are supported by the Nuage VSP Plugin, with their supported CloudStack versions.
| Hypervisor | CloudStack version |
|---|---|
| KVM 7.x | >= 4.5 |
| VMware ESXi 5.5 | >= 4.5 |
| VMware ESXi 6.0 | >= 4.9 |
Table: Supported Hypervisors
Supported Nuage VSP SDN Platform Versions
The following Nuage VSP SDN Platform versions are supported by the Nuage VSP Plugin, with their supported CloudStack versions.
| Nuage VSP version | CloudStack version |
|---|---|
| Nuage VSP v3.2 | >= 4.5 |
| Nuage VSP v4.0 | >= 4.10 |
Table: Supported Nuage VSP SDN Platform Versions
Configuring The Nuage VSP Plugin
Prerequisites
Before enabling and using the Nuage VSP Plugin with CloudStack.
- Verify that the CloudStack deployment (hypervisors) and Nuage VSP SDN Platform version you intend to use is being supported.
Note
Only the release notes for Nuage VSP contain the most up-to-date information on different supported versions. Please check them to verify that the information in this document is up-to-date.
- Prepare and configure the hypervisors for CloudStack integration with Nuage VSP SDN Platform.
Note
Please refer to the Nuage VSP Install Guide on how to prepare the hypervisors for Nuage VSP SDN Platform integration.
Required Nuage VSD Configuration
When configuring Nuage VSP as the network service provider in a CloudStack Zone, a CSP user must be added in Nuage VSD, and this user must be added to the CMS group. See Enable Nuage VSP Network Service Provider.
Note
Nuage VSD is the programmable policy and analytics engine of the Nuage VSP SDN Platform with which the Nuage VSP Plugin interacts.
Zone Configuration
Select VSP Isolation Method
The Nuage VSP solution is NOT supported in Basic zone provisioning mode.
- When adding a zone, the CloudStack administrator should select Advanced mode in the zone wizard.
- When laying out the physical network configuration during zone provisioning, the Guest network traffic should be put in a separate physical network of its own.
- This physical network carrying the Guest traffic should have VSP as the Isolation Method.
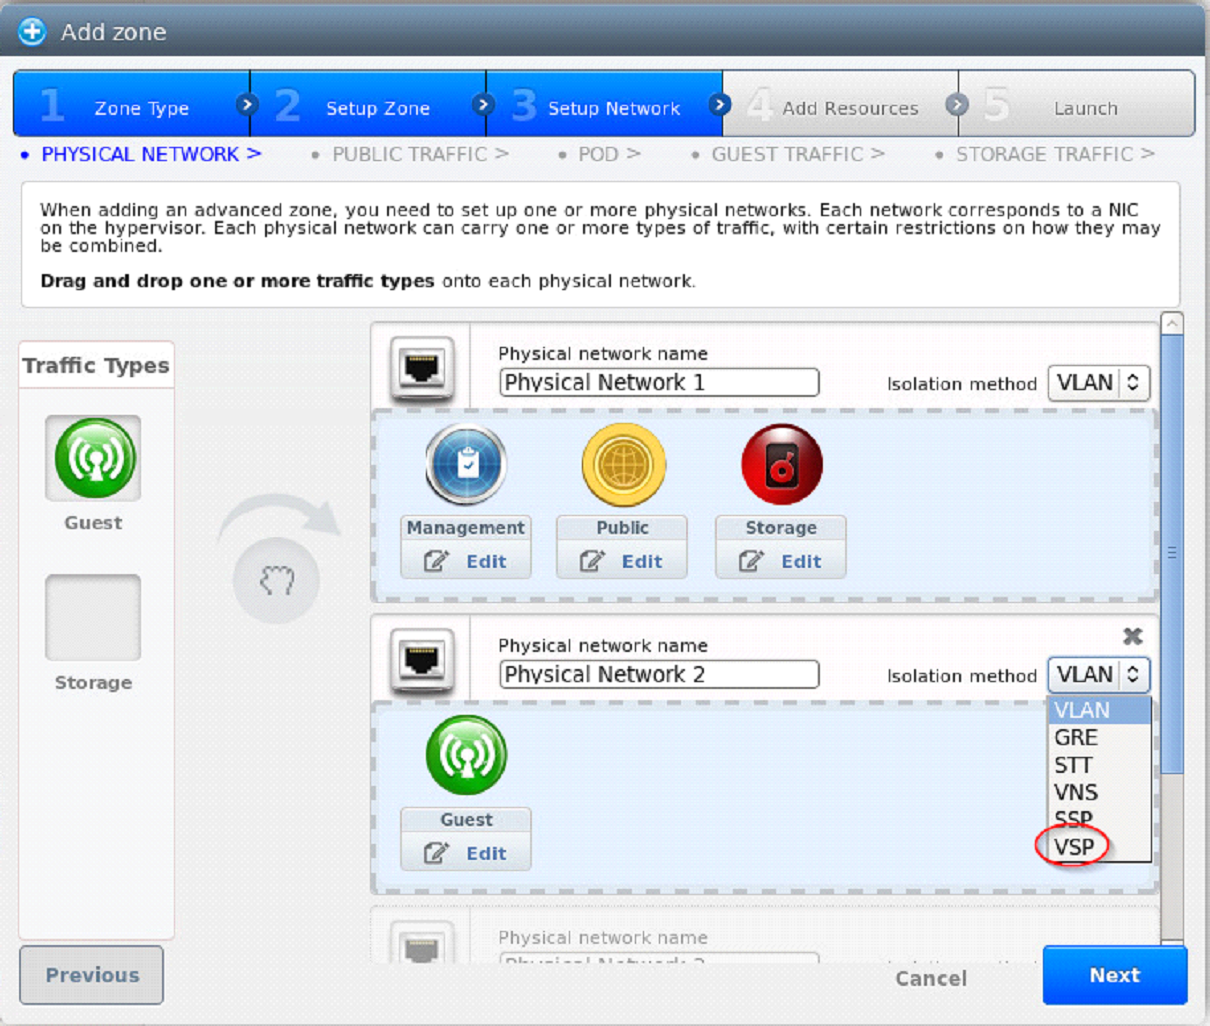
Setting Isolation Method to VSP
Update Traffic Labels
Guest Traffic Type
Select Edit on the Guest traffic type panel and update the Traffic Label:
- For KVM, use alubr0 as the KVM Traffic Label.
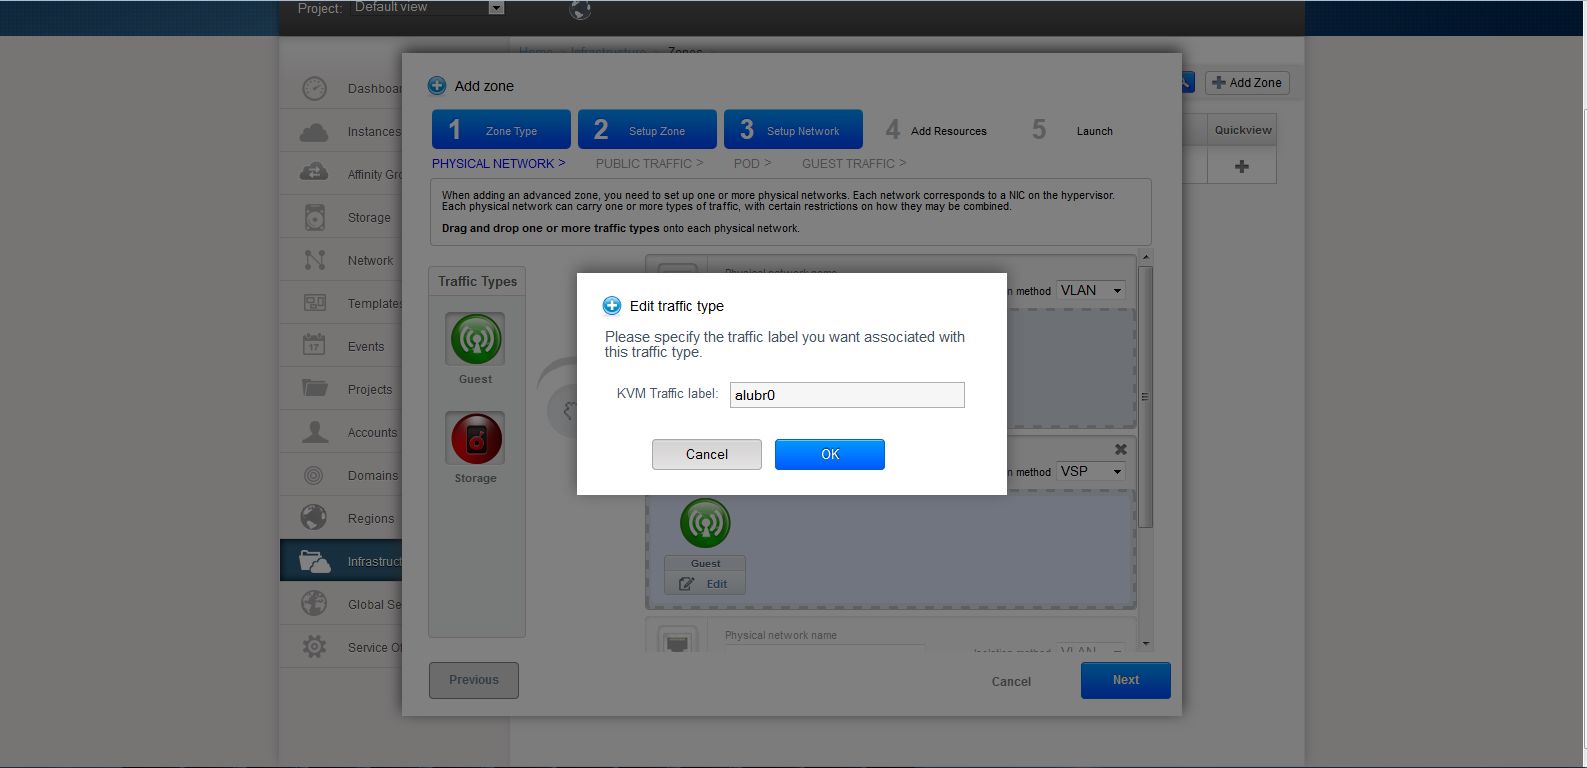
Specifying the Traffic Type in KVM
- For VMware ESXi, use the switch name used by dVRS for guest networking as the vSwitch Name, leave the VLAN ID field blank, and select VMware vNetwork Distributed Switch in the vSwitch Type drop down field.
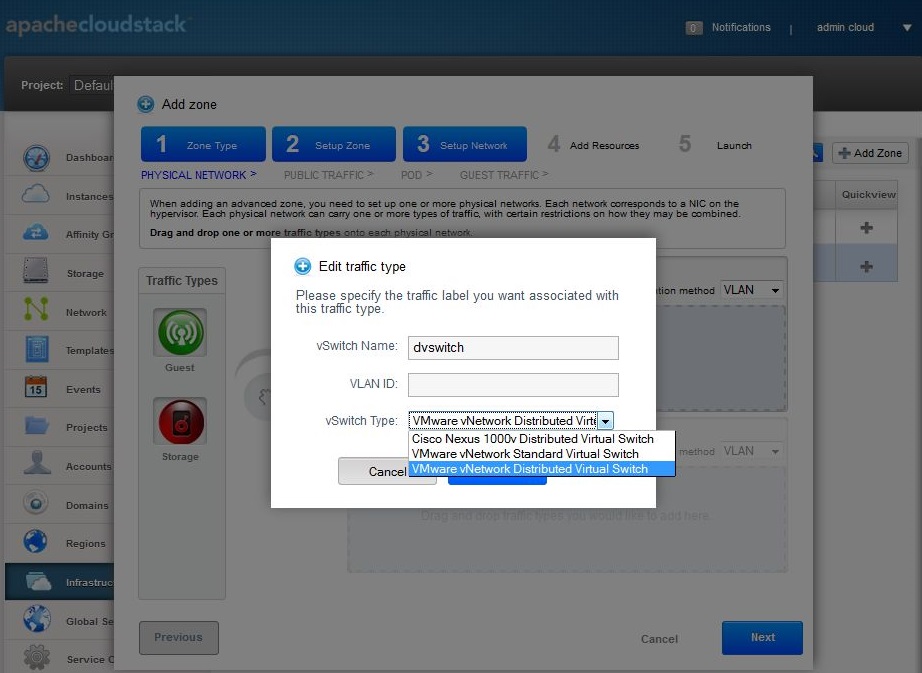
Specifying the Traffic Type in VMware ESXi
Enable Nuage VSP Network Service Provider
Nuage VSP must be added and enabled as a Network Service Provider in the CloudStack Zone before it can be used.
| Step 1: | Select Infrastructure > Zone > [zone name] > Physical Network 2 > Configure Network Service Providers > Nuage Vsp > +, which brings up the Add Nuage Virtualized Services Directory (VSD) panel. |
|---|---|
| Step 2: | Enter the Nuage VSD Host Name, Username and Password that was previously created. |
| Step 3: | Specify the Nuage VSD API version by entering the API version in the appropriate field (format: |
| Step 4: | EITHER Add Nuage VSD by clicking the OK button, OR use Nuage VSP API calls to configure Nuage VSP as a Network Service Provider in the CloudStack Zone; see Configure Nuage VSP API in the Appendix of this document. |
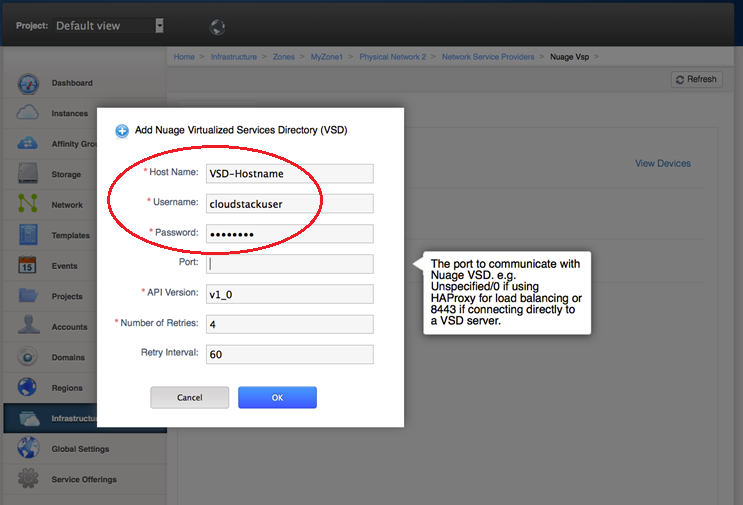
Adding Nuage VSD as the Network Service Provider
| Step 5: | Go to Infrastructure > Zones > [zone name] > Physical Network 2 > Network Service Providers > Nuage Vsp > Devices > Details tab as shown in the figure « Enabling Nuage VSP Network Service Provider » below. This indicates the state of Nuage VSP Network Service Provider. Enable Nuage VSP Network Service Provider by clicking Enable. |
|---|
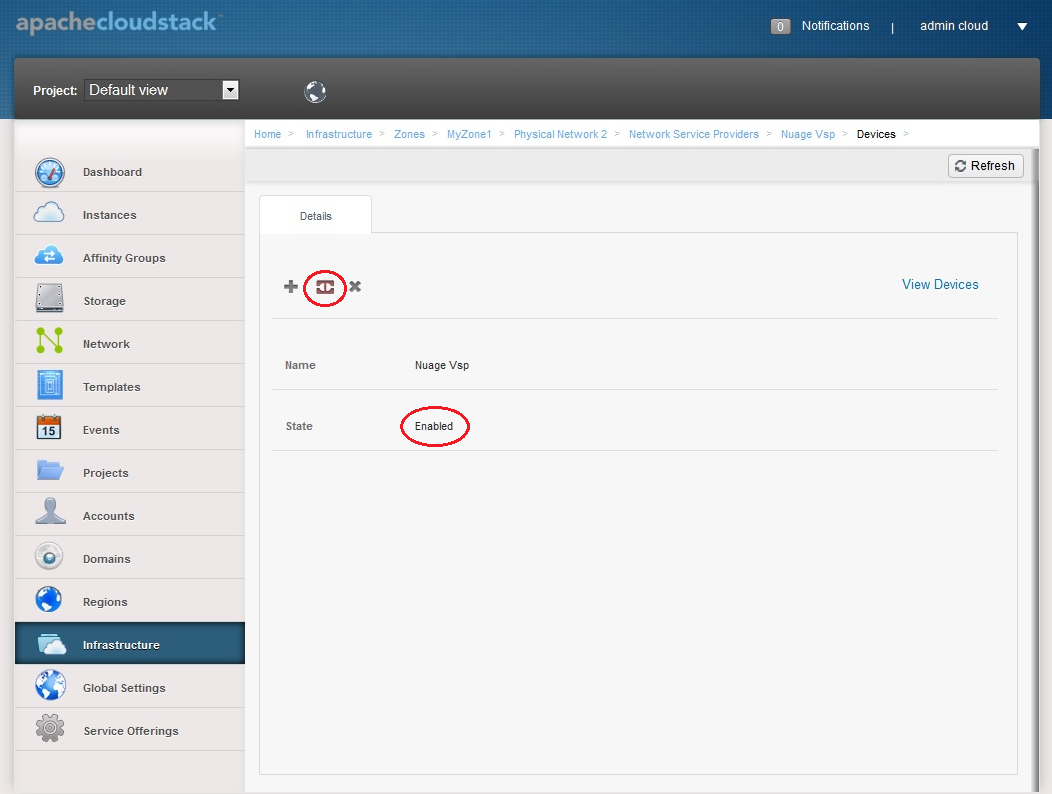
Enabling Nuage VSP Network Service Provider
| Step 6: | (Optional) View the Nuage VSP Network Service Provider status on the list of Network Service Providers on the Infrastructure > Zones > [zone name] > Physical Network 2 > Network Service Providers page; |
|---|
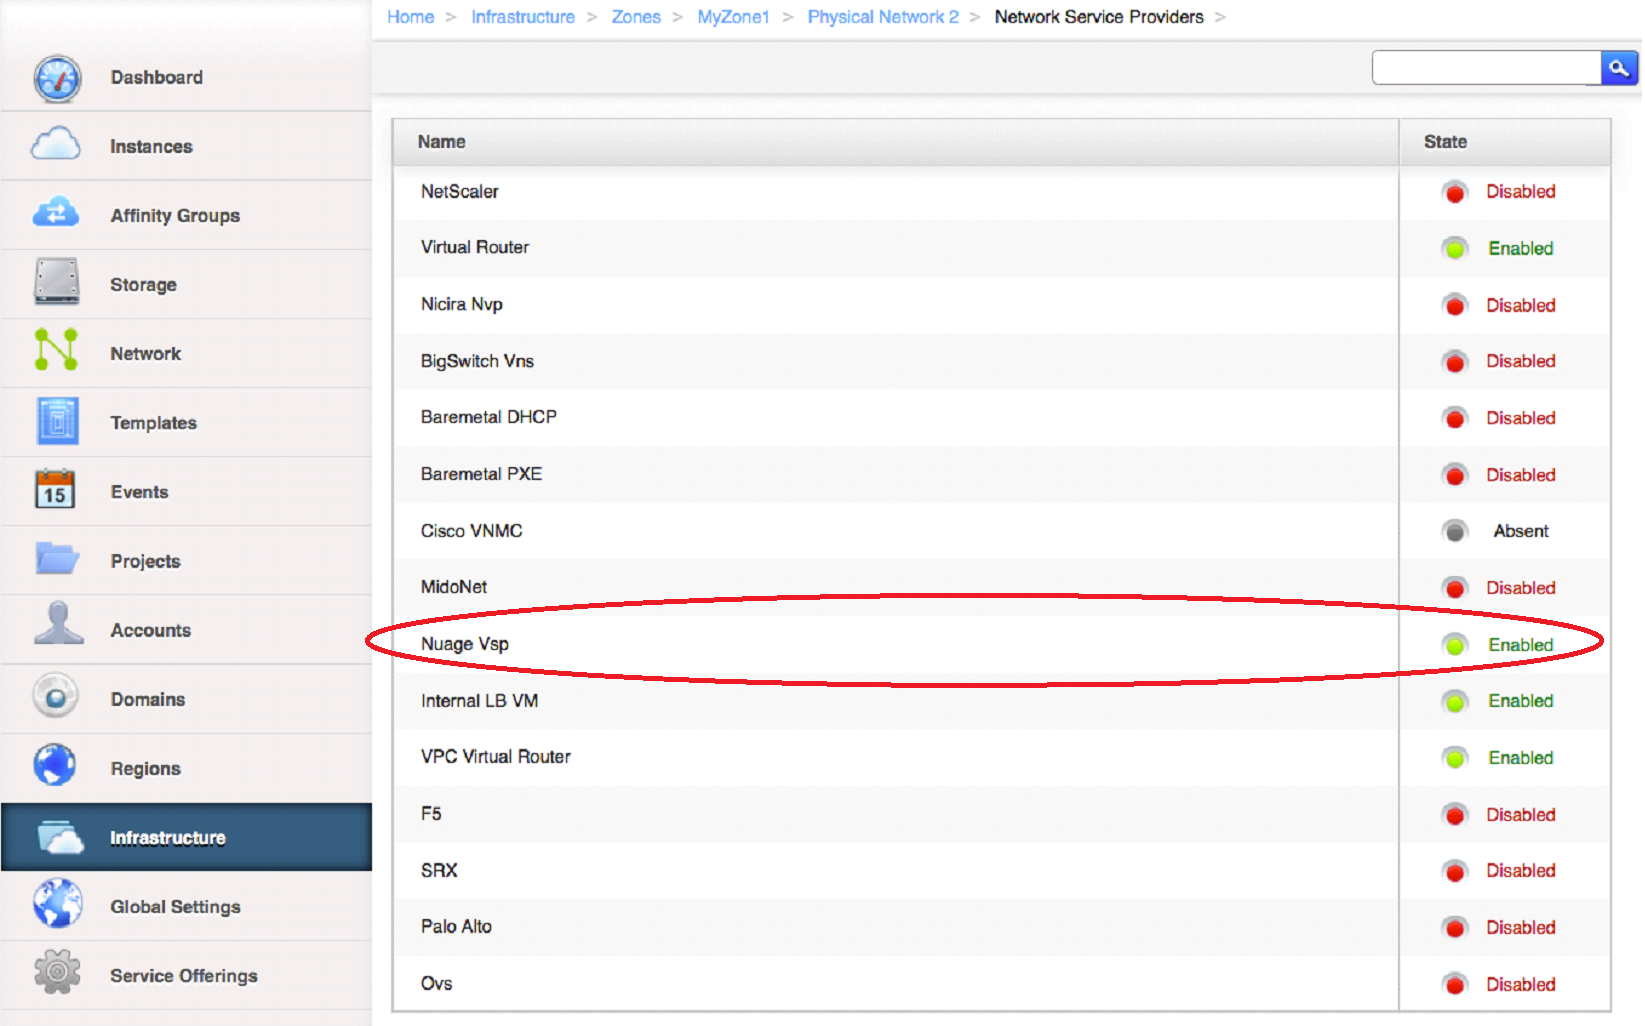
Viewing Network Service Providers Status
Using The Nuage VSP Plugin
Network Offerings
There are three types of Network Offerings that can be created:
- If Isolated Networks are required, then create a Isolated guest type network offering for use with Isolated Networks.
- If VPC deployments are required, then create a new Isolated guest type network offering for such deployments.
- If Shared Networks are required, then create a new Shared guest type network offering for use with Shared Networks.
Note
Per Zone MUST always be selected as the Supported Source NAT type when Source NAT service is being provided by NuageVsp.
Create and Enable Isolated Network Offering
- Select Service Offerings > Select Offering: Network Offerings > Add network offering, which brings up the Add network offering.
- In the Add network offering panel, add a Name and a Description to the network offering. Select Isolated as the Guest Type. In the Supported Services field select services and providers that are supported by the Nuage VSP Plugin for Isolated Networks, see Supported Features at the beginning of this document.
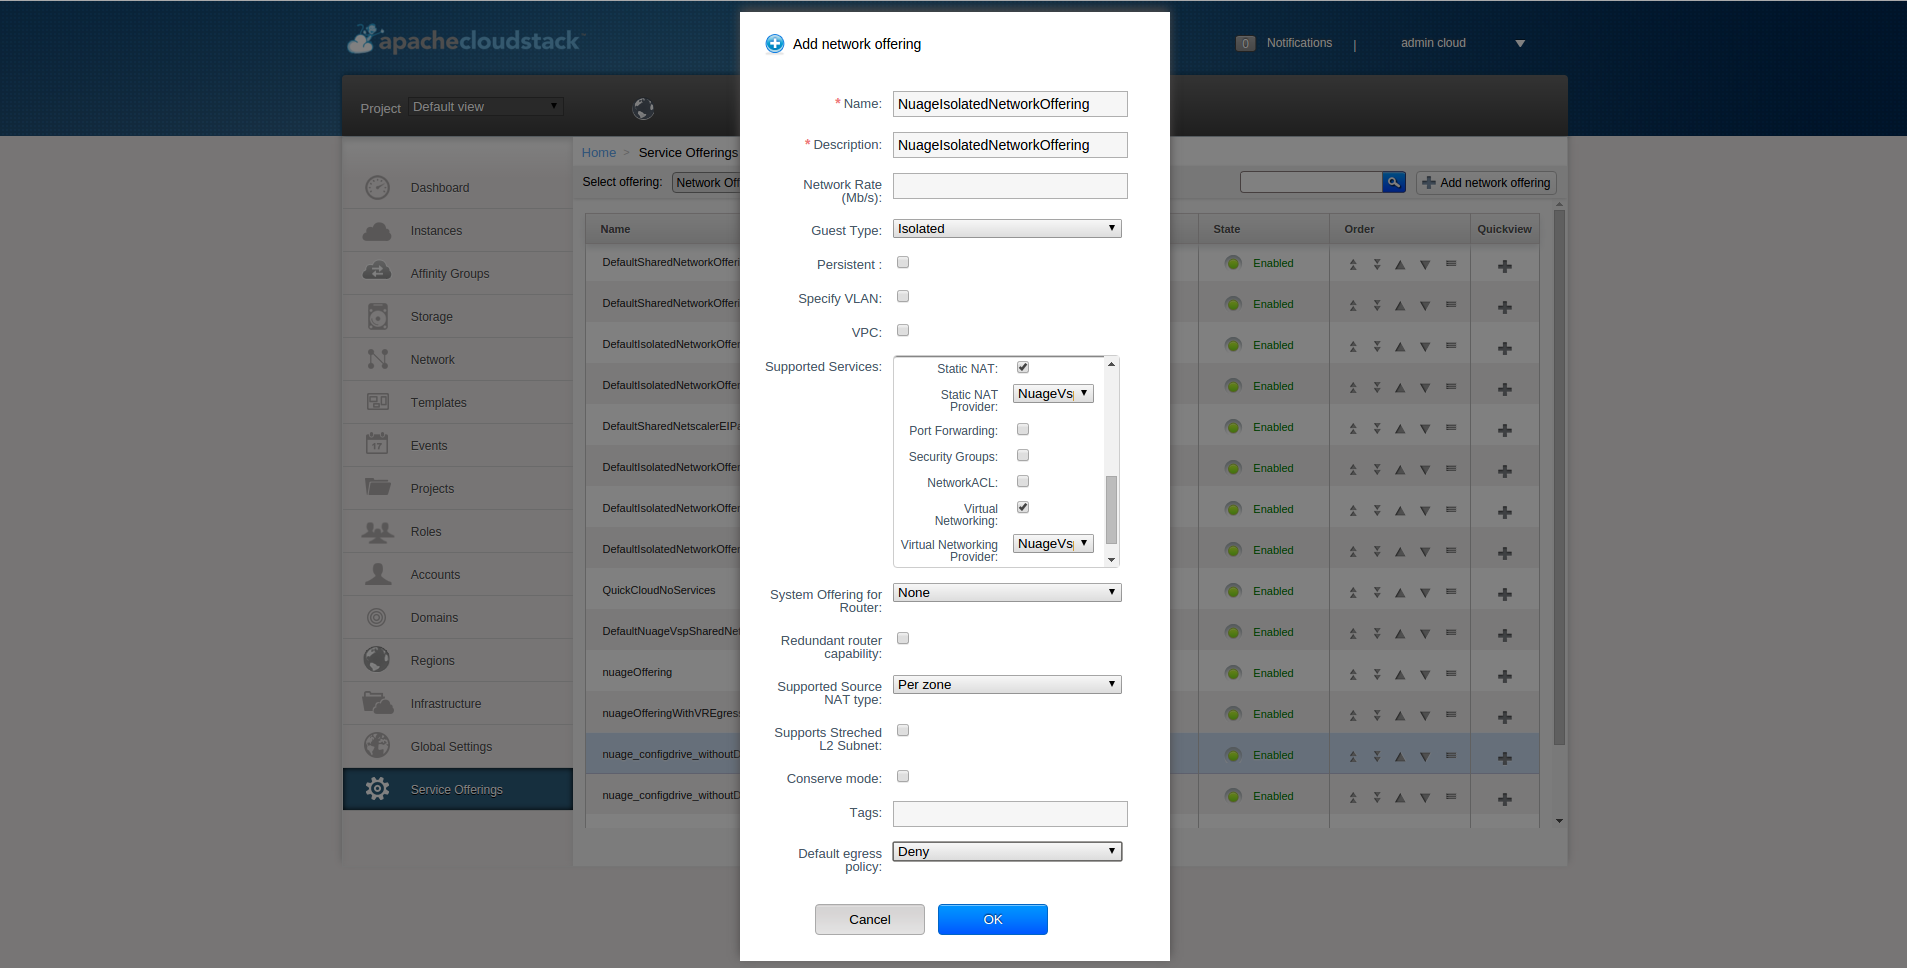
Creating Isolated Network Offering
- Click the OK button to create the network offering.
- After the network offering has been successfully created, enable it from the Service Offerings - Network Offerings list.
Create and Enable VPC Network Offering
- Select Service Offerings > Select Offering: Network Offerings > Add network offering, which brings up the Add network offering.
- In the Add network offering panel, add a Name and a Description to the network offering. Select Isolated as the Guest Type. Select the VPC field. In the Supported Services field select services and providers that are supported by the Nuage VSP Plugin for VPCs, see Supported Features at the beginning of this document.
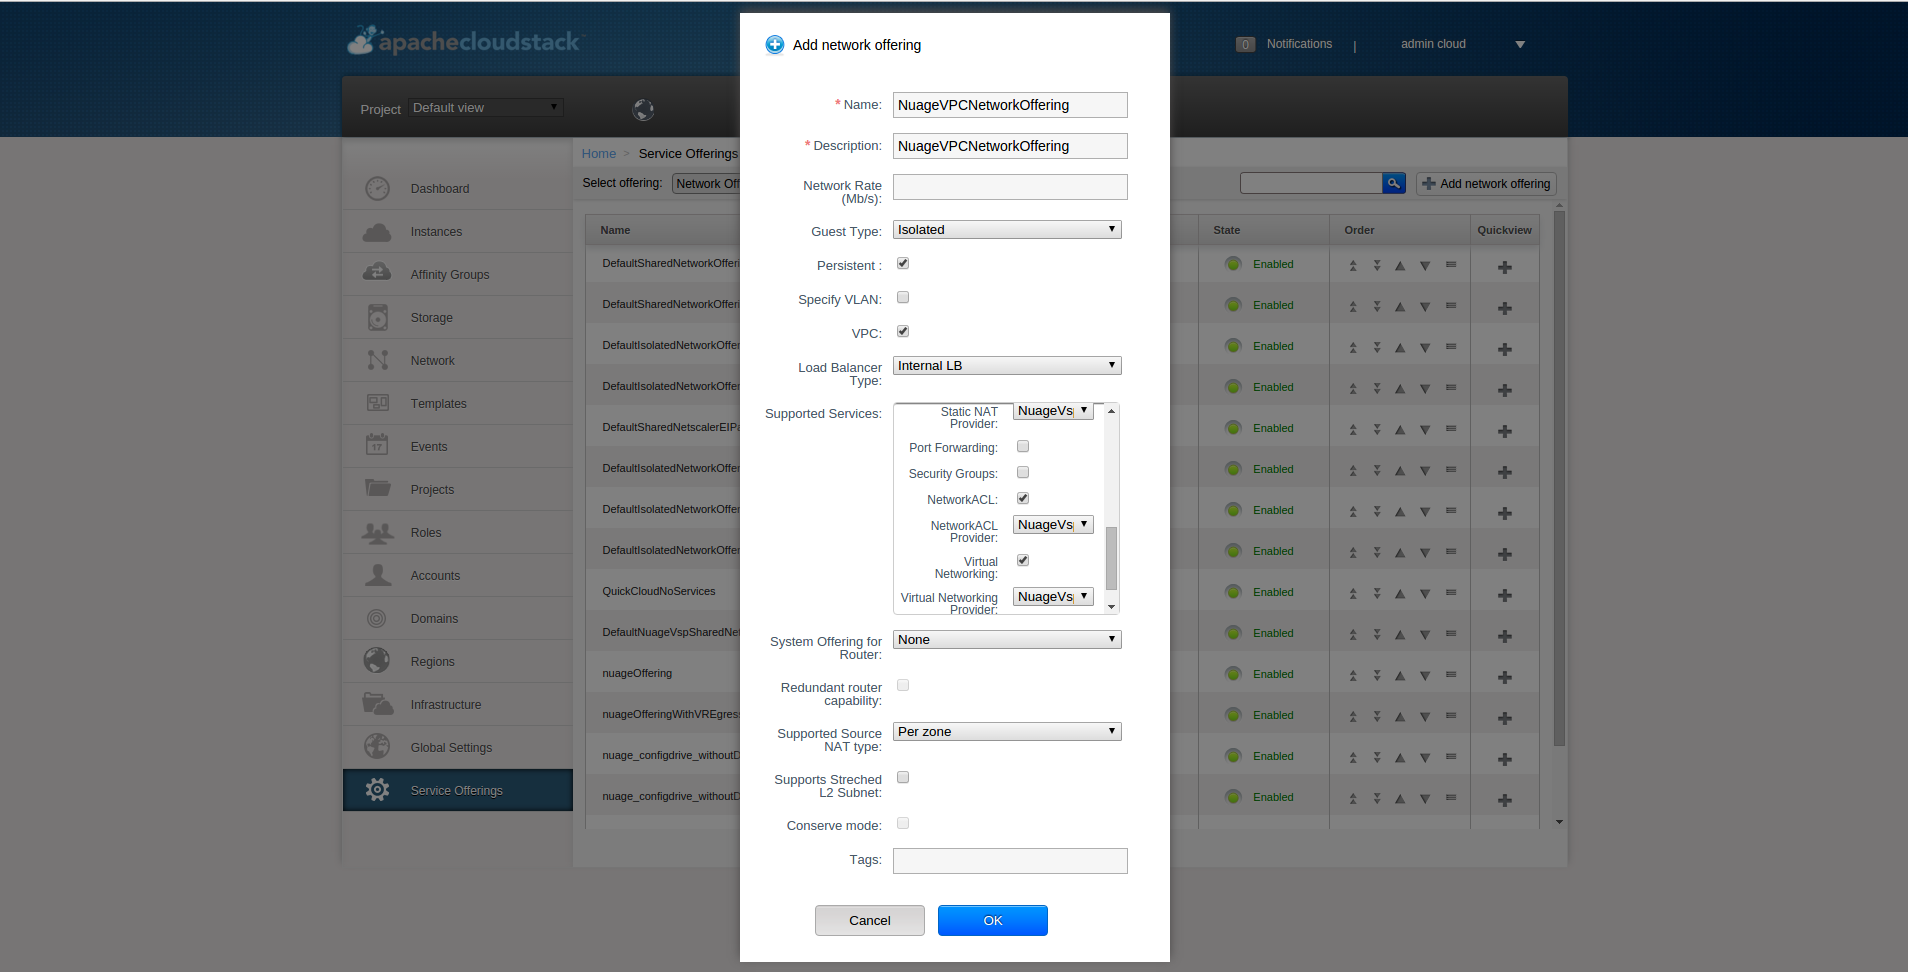
Creating VPC Network Offering
- Click the OK button to create the network offering.
- After the network offering has been successfully created, enable it from the Service Offerings - Network Offerings list.
Create and Enable Shared Network Offering
- Select Service Offerings > Select Offering: Network Offerings > Add network offering, which brings up the Add network offering.
- In the Add network offering panel, add a Name and a Description to the network offering. Select Shared as the Guest Type. In the Supported Services field select services and providers that are supported by the Nuage VSP Plugin for Shared Networks, see Supported Features at the beginning of this document.
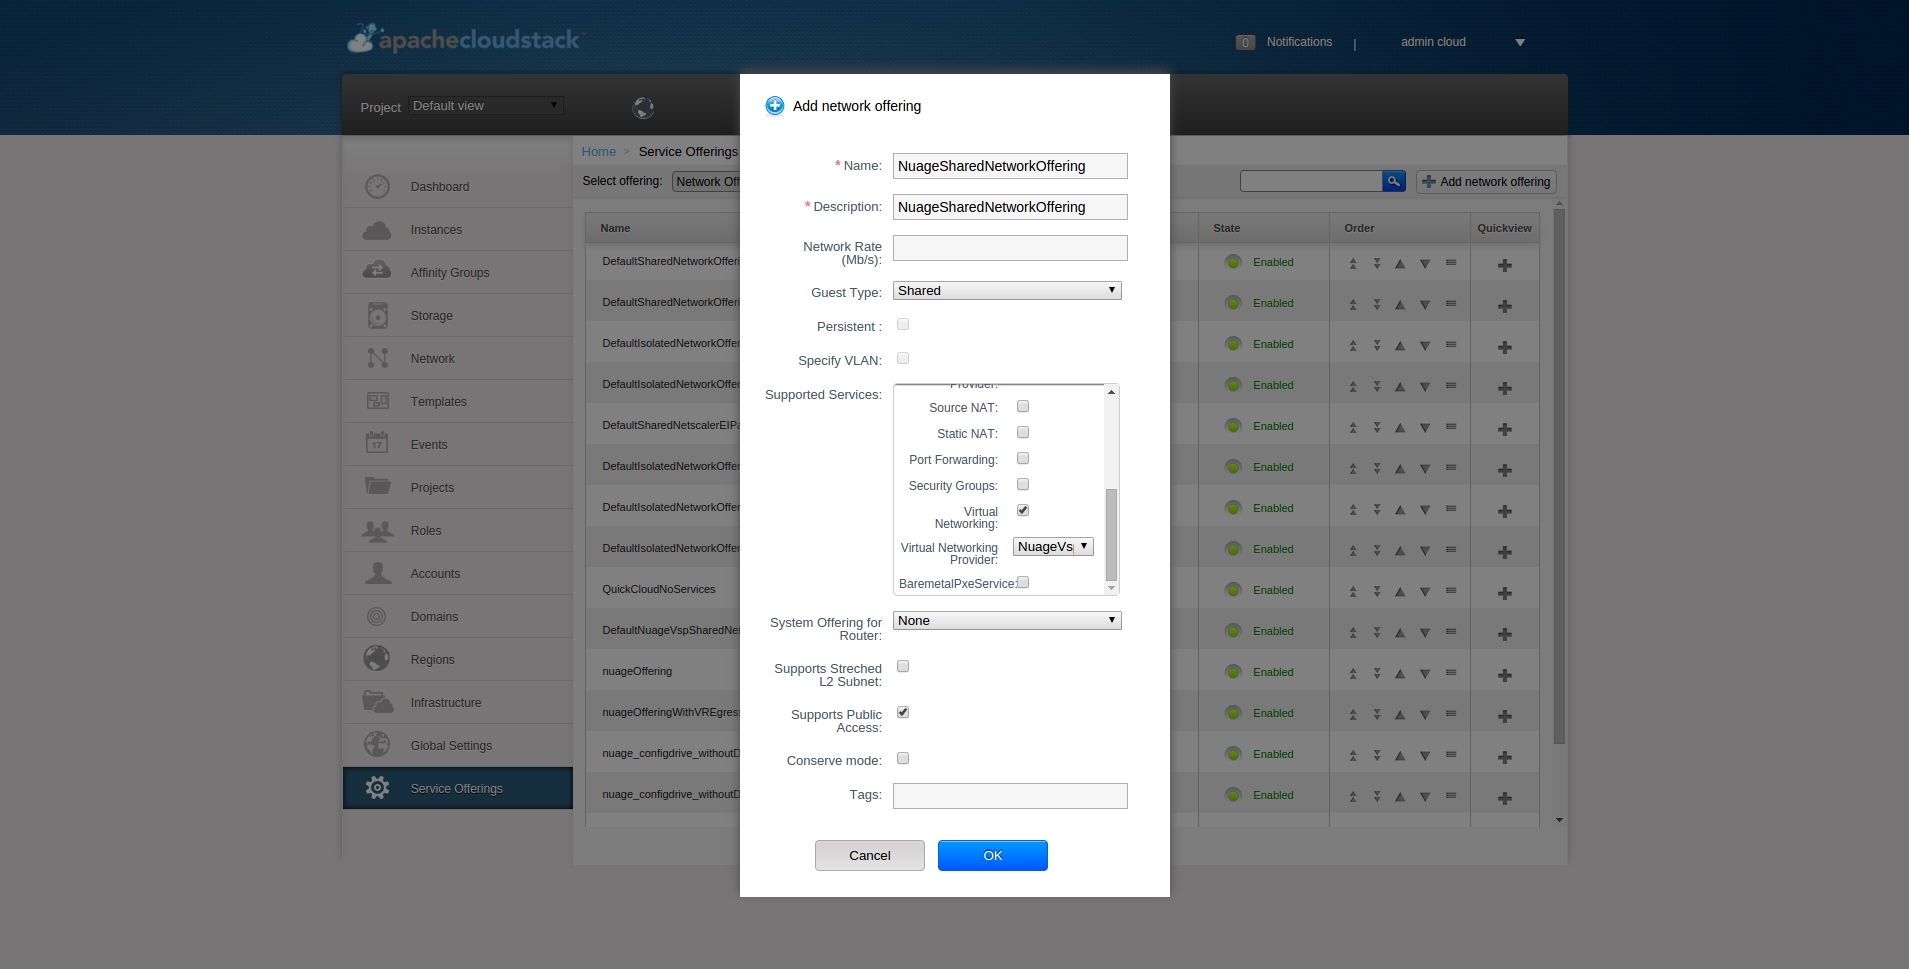
Creating Shared Network Offering
Note
Selecting the Supporting Public Access field in the Shared Network offering enables Public/Internet access to the VMs in the Shared Network.
- Click the OK button to create the network offering.
- After the network offering has been successfully created, enable it from the Service Offerings - Network Offerings list.
VPC Offerings
Pre-created and Enabled Nuage VSP VPC Offering
A VPC offering by the name Nuage VSP VPC Offering is pre-created and enabled in the list of Service Offerings - VPC Offerings (Select Service Offerings > Select Offering: VPC Offerings) which contains all the services and providers that are supported by the Nuage VSP Plugin for VPCs.
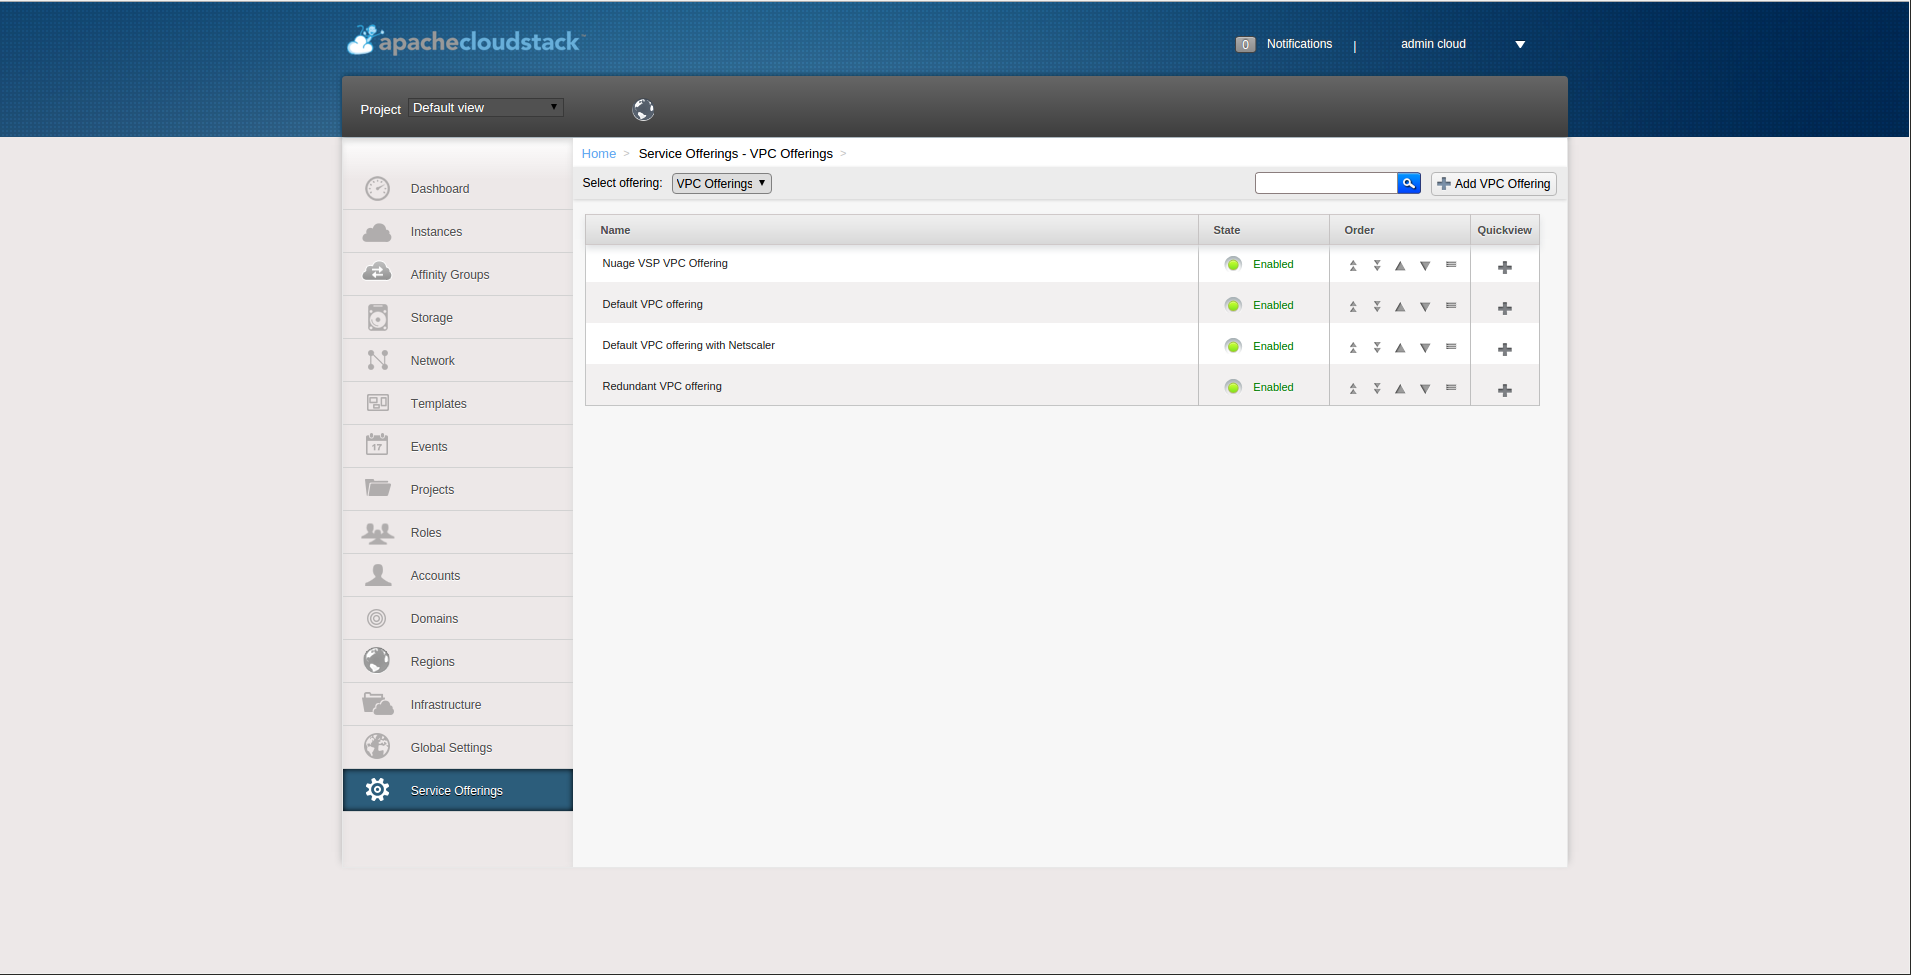
Pre-created and Enabled Nuage VSP VPC Offering
(Optional) Create and Enable VPC Offering
- Select Service Offerings > Select Offering: VPC Offerings > Add VPC Offering, which brings up the Add VPC Offering.
- In the Add VPC Offering panel, add a Name and a Description to the network offering. In the Supported Services field select services and providers that are supported by the Nuage VSP Plugin for VPCs, see Supported Features at the beginning of this document.
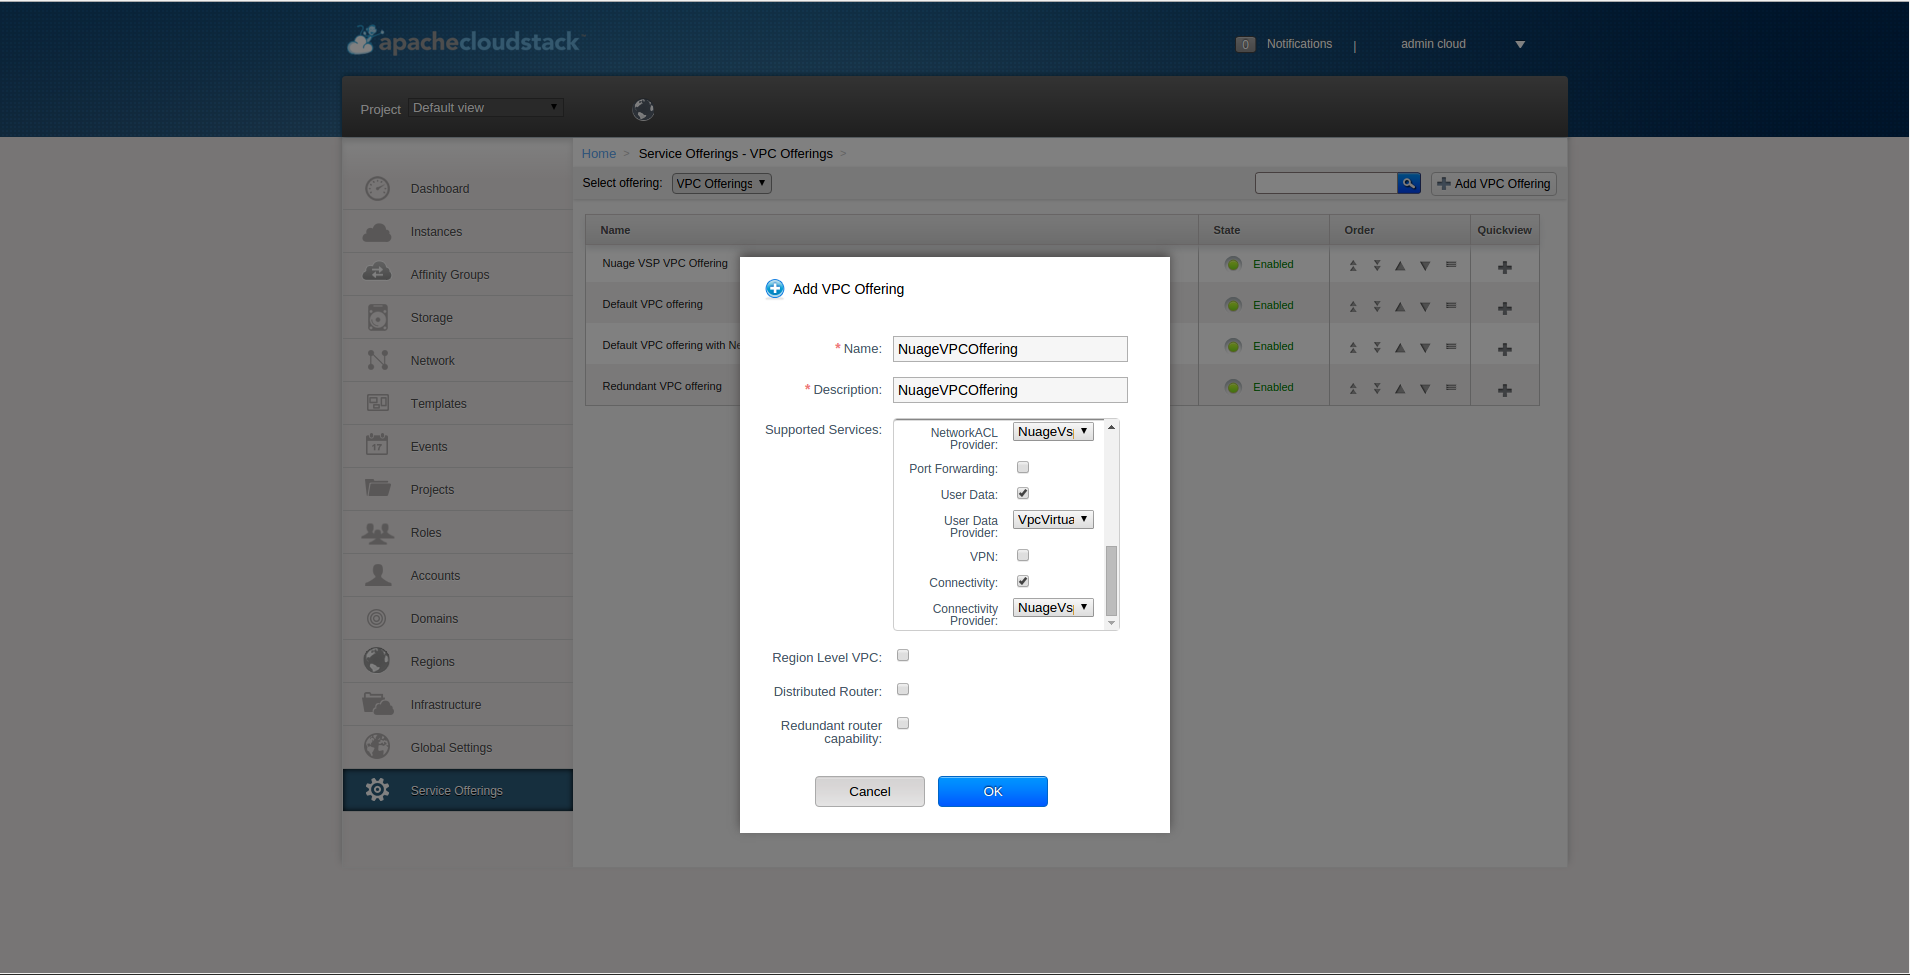
Creating VPC Offering
- Click the OK button to create the VPC Offering.
- After the VPC Offering has been successfully created, enable it from the Service Offerings - VPC Offerings list.
Dedicated Features Provided by The Nuage VSP Plugin
Nuage VSP Domain Template Feature Support for CloudStack
All the constructs (parameters and abstractions) defined in a Nuage VSD domain template can be made available to domain instances (i.e. networks) created in CloudStack. To do this, configure the Nuage VSP Plugin to use a pre-created Nuage VSD domain template when instantiating domains (i.e. creating networks). Networks created in CloudStack will then use domain instances created from the domain template.
Typical use-cases are:
- The basic ACLs on the top and bottom that bracket or “contain” the end-user’s ACLs.
- Leakable domains/GRT Leaking (Nuage VSP feature).
To configure a Nuage VSP domain template for use by CloudStack, use the Nuage VSD Architect (VSP’s GUI) to create a domain template and configure it in the following CloudStack global settings.
| Parameter | Type | Explanation | Supported CloudStack versions |
|---|---|---|---|
| nuagevsp.isolatedntwk.domaintemplate.name | String | Name of the Nuage VSP domain template to use for creating domains for isolated networks | >= 4.5 |
| nuagevsp.vpc.domaintemplate.name | String | Name of the Nuage VSP domain template to use for creating the domain for VPCs | >= 4.5 |
| nuagevsp.sharedntwk.domaintemplate.id | UUID | UUID of the Nuage VSP domain template to use for creating the domain for Shared Networks | >= 4.10 |
Table: CloudStack Global Settings For Configuring Nuage VSP Domain Template Feature
Nuage VSP Source NAT via the Underlay Feature Support For CloudStack
Supported CloudStack versions: >= 4.10
CloudStack provides Source NAT service to enable guest VMs to send traffic out to the Internet without requiring a Static NAT IP (public IP) assigned to the VM. The Source NAT service must be enabled as part of the network offering used for creating the guest network. When a network is created using this network offering, the first public IP from the assigned public IP range is automatically acquired as the Source NAT IP for the network. All VMs attached to this network then use that Source NAT IP to send traffic to the Internet.
The Nuage VSP Plugin for CloudStack supports CloudStack’s native Source NAT service and enhances it by restricting to a minimum the number of public IP addresses assigned to any given tenant. This is achieved by not allocating a Source NAT IP for every network that is created.
The Source NAT service that Nuage VSP calls the Port Address Translation (PAT) feature uses the hypervisor IP as the Source NAT IP address for all VMs in the hypervisor that need to send traffic out to the Internet. Configure this during Nuage VSP installation using the instructions given in the Nuage VSP Install Guide.
This feature is supported for both VPCs and Isolated Networks. In the case of VPCs, Source NAT is applied at the Nuage VSP domain level, therefore there is no customization on the individual VPC network (tier) level.
All VPCs and Isolated networks that are created from a Nuage VSP Source NAT-enabled network offering have this feature enabled automatically. An example Nuage VSP Source NAT-enabled network offering is shown in the figure « Nuage VSP Source NAT-enabled Network Offering » below.
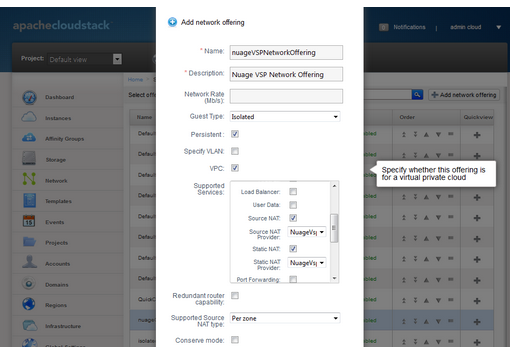
Nuage VSP Source NAT-enabled Network Offering
Nuage VSP Static NAT via the Underlay Feature Support For CloudStack
Supported CloudStack versions: >= 4.10
Static NAT is supported in Nuage VSP as FIP (Floating IP). Prior to Nuage VSP v3.2, FIP in Nuage VSP required a VXLAN GW/PE to be present in the data center. In Nuage VSP v3.2 and above FIP is supported via the underlay, which removes the requirement for a GW/PE in the DC.
For the Static NAT without GW/PE feature to be operational in the CloudStack plugin, FIP in Nuage VSP must be configured to use the underlay. This operation takes place during Nuage VSP installation; instructions can be found in the Nuage VSP Install Guide.
A new API called nuageunderlayvlaniprange has been introduced to enable/disable Static NAT via the Underlay feature support for CloudStack public IP ranges being used for Static NAT service. This API specifies whether the FIP to underlay support is required for the corresponding FIP subnet in Nuage VSD since there is no GW/PE in the data center. When the nuageunderlayvlaniprange API has been enabled/disabled for a public IP range and Static NAT is enabled on at-least one of its Public IPs, the plugin creates the corresponding shared FIP subnet in Nuage VSD using the sharednetworkresources API with the underlay flag set accordingly. The nuageunderlayvlaniprange API usage is shown in the figure « nuageunderlayvlaniprange API Usage » below.
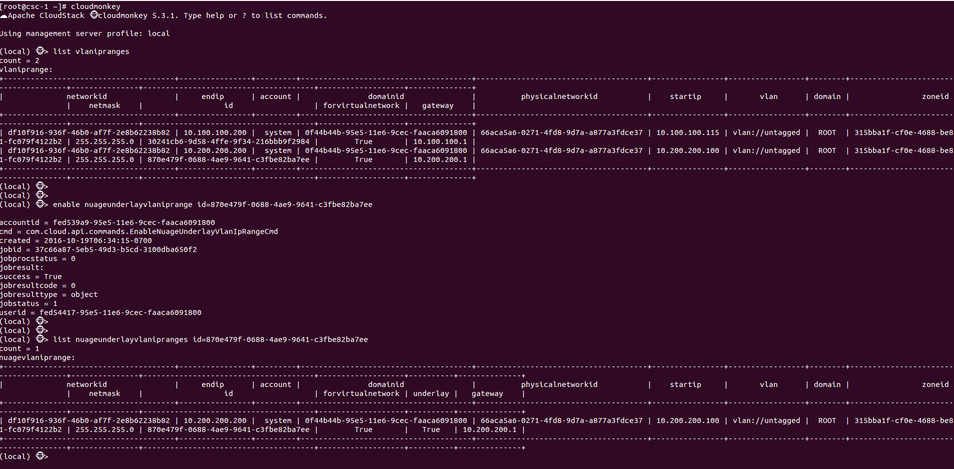
nuageunderlayvlaniprange API Usage
By default, the Nuage VSP Plugin creates the corresponding shared FIP subnet in Nuage VSD with the underlay flag set to false (disabled). There is no support for the nuageunderlayvlaniprange API from the CloudStack UI.
Note
Enabling/disabling the nuageunderlayvlaniprange API for CloudStack public IP ranges is supported only before the Nuage VSP plugin creates the corresponding shared FIP subnet in Nuage VSD. After a shared FIP subnet is created in Nuage VSD, its underlay flag cannot be changed. To change the underlay flag for a given shared FIP subnet, delete the Public vLanIPRange, recreate it and enable/disable the nuageunderlayvlaniprange API for it.
Running The Nuage VSP Plugin Specific Marvin Tests
The Nuage VSP Plugin specific Marvin tests can be found under the directory test/integration/plugins/nuagevsp/ in the cloudstack tree.
Here is the list of required Python packages and dependencies to run The Nuage VSP Plugin specific Marvin tests:
- marvin
- vspk
- libVSD
- pyyaml
- netaddr
- futures
Note
vspk is a Python SDK for Nuage VSP’s VSD and libVSD is a library that wraps vspk package, which are open sourced and can be found at https://github.com/nuagenetworks.
Here is an example nosetests command to run The Nuage VSP Plugin specific Marvin tests:
nosetests --with-marvin --marvin-config=path-to-marvin-config-file/nuage_marvin.cfg path-to-marvin-tests/test/integration/plugins/nuagevsp/test_nuage_vsp.py
Note
For an example Marvin config file (i.e. nuage_marvin.cfg) required to run The Nuage VSP Plugin specific Marvin tests, refer Nuage VSP Marvin Config File Format in the Appendix of this document.
Appendix
Configure Nuage VSP API
To configure Nuage VSP as a Network Service Provider in the CloudStack Zone.
- Add Nuage VSP as a Network Service Provider in the Physical Network 2:
cloudmonkey add networkserviceprovider name=NuageVsp physicalnetworkid=<physicalNetwork2Id>
- Add the Nuage VSD as a Nuage VSP Device in the Physical Network 2:
cloudmonkey add nuagevspdevice physicalnetworkid=<physicalNetwork2Id> hostname=<hostnameOfNuageVsp> username=<usernameOfNuageVspUser> password=<passwordOfNuageVspUser> port=<portUsedByNuageVsp> apiversion=<apiVersionOfNuageVsp> retrycount=<nrOfRetriesOnFailure> retryinterval=<intervalBetweenRetries>
Nuage VSP Marvin Config File Format
Format for the Marvin config file required to run The Nuage VSP Plugin specific Marvin tests.
{
 "zones": [
     {
         "name": "ZONE1NAME",
         "physical_networks": [
             {
                 "name": "Physical Network 1",
                 "isolationmethods": [
                     "VLAN"
                 ]
             },
             {
                 "name": "Physical Network 2",
                 "isolationmethods": [
                     "VSP"
                 ],
                 "providers": [
                     {
                         "name": "NuageVsp",
                         "devices": [
                             {
                                 "username": "VSDUSERNAME",
                                 "retryinterval": "60",
                                 "hostname": "VSDSERVER",
                                 "apiversion": "VSDVERSION",
                                 "retrycount": "4",
                                 "password": "VSDUSERPASSWORD",
                                 "port": VSDPORT
                             }
                         ]
                     }
                 ]
             }
         ],
         "dcInternetConnectivityInfo" : {
             "available": "INTERNETAVAILABLE",
             "httpProxy": "HTTPPROXY",
             "httpsProxy": "HTTPSPROXY"
         }
     },
     {
         "name": "ZONE2NAME",
         "physical_networks": [
             {
                 "name": "Physical Network 1",
                 "isolationmethods": [
                     "VLAN"
                 ]
             },
             {
                 "name": "Physical Network 2",
                 "isolationmethods": [
                     "VSP"
                 ],
                 "providers": [
                     {
                         "name": "NuageVsp",
                         "devices": [
                             {
                                 "username": "VSDUSERNAME",
                                 "retryinterval": "60",
                                 "hostname": "VSDSERVER",
                                 "apiversion": "VSDVERSION",
                                 "retrycount": "4",
                                 "password": "VSDUSERPASSWORD",
                                 "port": VSDPORT
                             }
                         ]
                     }
                 ]
             }
         ],
         "dcInternetConnectivityInfo" : {
             "available": "INTERNETAVAILABLE",
             "httpProxy": "HTTPPROXY",
             "httpsProxy": "HTTPSPROXY"
         }
     }
 ],
 "dbSvr": {
     "dbSvr": "DBSERVER",
     "passwd": "DBPASSWORD",
     "db": "cloud",
     "port": 3306,
     "user": "DBUSERNAME"
 },
 "logger":
     {
         "LogFolderPath": "/tmp/LOGFOLDERNAME"
     },
 "mgtSvr": [
     {
         "mgtSvrIp": "MGNTSERVERIP",
         "port": 8096,
         "user": "MGNTUSERNAME",
         "passwd": "MGNTPASSWORD"
     }
 ]
 }